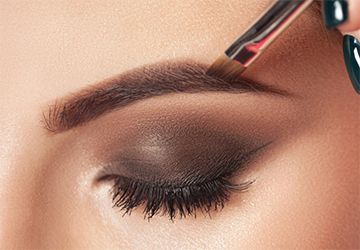
A step-by-step guide to creating the perfect smoky eye look for makeup beginners. Learn techniques from shade color selection and mixing to common mistakes and troubleshooting tips.
1. Choose your shade shade
Choose 2-3 matching eyeshadows in varying intensities to create a smoky ombré effect.
Base tone – matte, neutral, close to skin tone
Mid-tones - darker neutrals such as browns, taupes, grays
Darkest shade - dark charcoal or brown for added intensity
Stick to matte finishes that blend better than shiny finishes.

2. Start with the basics
Create a smooth shaded canvas by:
Apply a primer to the lids and let the shade set
Conceals discoloration on the eyelids and under the eyes
Use a thin layer of primer and concealer
The suitable underlay will prevent creases and fading.
3. Apply a base shadow
Apply primer all over the eyelid and brow bone.
Apply the base color with a fluffy brush
Concentrate on the inner 2/3 of the eyelid to the brow bone
Blend outward towards outer corners
Soften the edges of the top crease
This ensures a smooth start.
4. Build up the mid-tone
Add definition by applying mid-tone shadows:
Use a crease brush to press a medium eyeshadow onto the outer half of the lid
Smooth the top and bottom creases into a circle
Concentrate Strength on Outer Corners
Stop mid-tone shadows before the inner corners
Gradually add color while softening edges.
5. Darken the effect with the darkest tone
To darken and refine shapes:
Pick out dark shadows with a pencil brush
Dab the outer corner of the eyelid in a V-shape
Sweep along the upper and lower lash lines
Dab the brush into the crease of the lid, blending with mid-tones
The darker shadows on the outside enhance the gradient effect.
6. Integrate everything seamlessly
Blend all the shades for a soft, alluring effect:
Use a wiper action to spread the edge between the shutters
If needed, add more mid-tones to continue the gradient
Slowly build strength in thin layers
Keep brushes clean to avoid contamination
Blends for a seamless, smoldering look.
7. Add the finishing touches
To complete and accentuate your smoky eye look:
Line the upper eyelids with a pencil or liquid eyeliner
Apply two coats of black mascara
Lightly dab highlighter on the inner corners and brow bone
If necessary, clean the edges with a cotton swab
Eyeliner, mascara, and highlighter complete the look.
8. Common rookie mistakes
Avoid these pitfalls for better results:
There is no need for primer and concealer - they keep the shadow in place
Putting dark eyeshadow too high - place it under the lid to lift the eye
Overmixing - Gentle agitation to avoid sludge buildup
Overuse of highlighter – keep it subtle on the inner corners and browbones
This mindfulness technique can prevent common smokey eye accidents.
9. Troubleshooting Tips
If your smoky eye makeup isn't looking great, try these quick fixes:
Are the shadows mottled? Bring more shade.
Hard edges? Mix more.
Uneven color? Add more mid-tone shadows to balance it out.
Look muddy? Clean up the brush and redefine the shape with mid-tones.
Target problem areas and blend to restore gradients.
Diploma
Achieving the perfect beginner smoky eye look involves strategic color placement, gradual buildup, and proper blending. Use neutral, matte shades in light, medium and dark intensity. Sweep from lightest to darkest color to carefully define edges and blend seamlessly. Avoid common mistakes, such as dark shadows that are too high. You can create a stunning smoky eye look with a bit of practice.